Welcome, Here you will learn about Docker.
Understanding Docker
Docker is a platform that allows developers to easily create, deploy, and run applications in containers. Containers are like lightweight, portable versions of virtual machines. They allow you to package up an application and all its dependencies into a single container, so that the application can run consistently across different environments.
The benefits of Docker:
Deployment and portability: Docker allows developers to easily create and manage isolated environments for their applications, known as "containers." This improves application portability and eliminates "works on my machine" issues.
Consistent environments: Docker makes it easy to distribute and run your applications in a consistent manner, regardless of the environment they're deployed in. This is especially useful for microservices-based architectures.
Cost and effort reduction: Docker provides a simple and consistent way of packaging, shipping and running applications in any infrastructure, reducing time, cost and effort of deploying and scaling.
Resource Utilization: One of the key advantages of Docker is that it allows multiple applications or services to run on the same host, making better use of system resources and reducing costs.
Industry standard: Docker allows for greater flexibility and ease of use when compared to traditional virtualization technologies, and is quickly becoming the standard for containerization in the software industry.
Collaboration among developers: Docker allows for easy collaboration among developers, since they can share containers with others and enable them to reproduce issues or test new features.
Easy migration to cloud: Docker enables easy migration of application to cloud providers, as most cloud providers support running of containers on their platform.
Minimized overhead: Docker allows to minimize the overhead and provides a fast, low-overhead way to run software, you can run thousands of containers on a single physical or virtual machine.
Additional layer of security: Docker provides an additional layer of security, by isolating the application and its dependencies from the underlying host.
Scaling: Docker allows for quick scaling, you can easily spin up new instances of a containerized application to handle increased traffic and automatically remove instances that are no longer needed.
The downsides...
-
Complexity: Docker can add an additional layer of complexity to an application's architecture, and requires a good understanding of containerization and orchestration to be used effectively.
-
Resource Utilization: Running multiple containers on a single host can lead to increased resource usage, and this may impact the host's performance if the resources are not managed properly.
-
Security: While Docker can provide an additional layer of security by isolating the application and its dependencies from the underlying host, it's not bulletproof. Applications running in containers can still be vulnerable to attacks. Additional security measures such as secure defaults, access control, and networking policies are still needed.
-
Persistent data storage: One of the core characteristics of Docker containers is that they are ephemeral, which means that data within a container does not persist when the container is deleted or recreated. This can be an issue for applications that require data to be stored permanently. However, this can be overcome by using external storage solutions that can be connected to containers or with Volumes.
-
Software compatibility: If you want to use a specific version of a software and it is not available as a container image you may need to build and containerize the software which may be hard, time-consuming and may introduce other complexities.
-
Debugging: When issues arise in a containerized application, debugging can be more difficult than with a traditional, non-containerized application. The isolation provided by containers can make it more difficult to identify the source of a problem.
What is a container?
A container is a lightweight, stand-alone, executable package that includes:
-
Code: The application or service code that needs to run
-
Runtime: The environment in which the application runs, including system tools, libraries and settings
-
Isolation: It is isolated from the rest of the system, so that the application can run consistently regardless of where it's deployed.
-
Consistency: It provides a consistent environment for the application to run, regardless of the infrastructure.
-
Lightweight: Compared to virtual machines, they share the host kernel and only include the necessary libraries and dependencies.
-
Dependency and configuration encapsulation: It encapsulates the dependencies and configurations of an application, allowing it to be easily moved and run consistently across different environments.
-
Deployment, execution and scaling: The containerization process and deployment are handled by the Docker engine, which uses the Docker image as a blueprint to create and run containers, provides a unified management of containers across multiple hosts and enables easy scaling and orchestration of containerized applications.
-
Share and reuse: Containers can be easily shared and reused among development teams.
In summary, a container is an isolated and consistent environment for running applications in a lightweight and portable format. It allows developers to package an application and its dependencies into a single container, making it easy to deploy and run consistently across different environments.
What is a container image?
A container image is a pre-configured environment for your application that includes:
-
Filesystem: The application's code, runtime, system tools, libraries, and settings are all bundled together in a filesystem layout.
-
Metadata: Additional information about the image, such as the author, version, and labels for identifying and organizing the image.
-
Immutable: Once an image is built and pushed, it can be considered as an immutable package. The image will not change even if new commands are executed on top of the container built from that image.
-
Versioned: Images can be versioned, allowing users to roll back to a previous version if necessary.
-
Share and reuse: Images can be easily shared and reused among development teams.
-
Small and efficient: Images are small and efficient, making them easy to distribute and store.
-
Build and push: They are built and pushed to a registry, which is a place where images are stored and distributed.
In summary, a container image is a pre-configured and versioned package of an application or service that includes everything needed to run it. It provides a lightweight and portable format that can be easily shared and reused among development teams. Container images are built and pushed to a registry, where they can be stored and distributed to be used to create and run containers.
Docker architecture
Docker uses a client-server architecture. The Docker client talks to the Docker daemon, which does the heavy lifting of building, running, and distributing your Docker containers. The Docker client and daemon can run on the same system, or you can connect a Docker client to a remote Docker daemon. The Docker client and daemon communicate using a REST API, through UNIX sockets, or a network interface. Another Docker client is Docker Compose, which allows you to work with applications that consist of a set of containers.
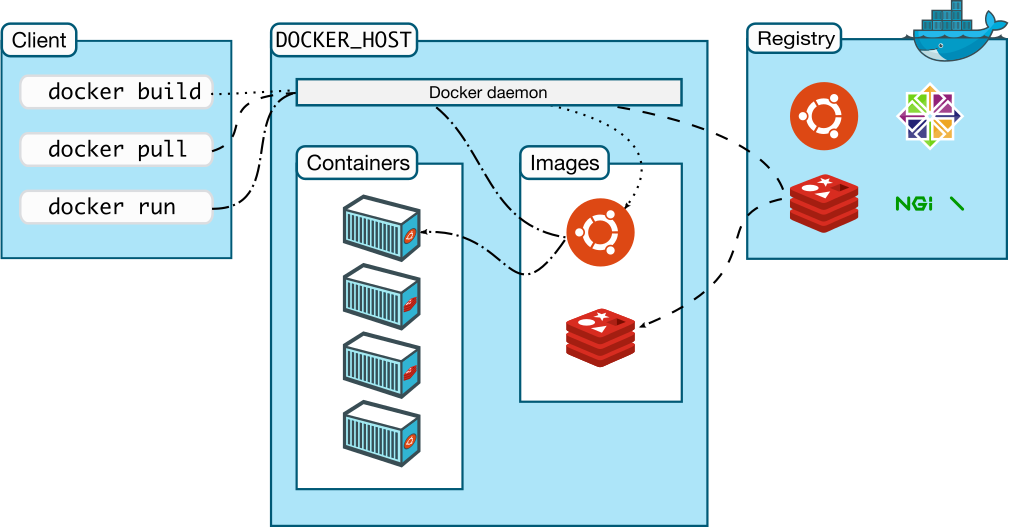
Docker's architecture is composed of several layers that work together to provide the functionality of the platform. Here's an overview of the key components of Docker's architecture:
-
Docker Engine: The core component of Docker's architecture, the Docker Engine is responsible for creating and managing containers, images, networks, and volumes. It provides a REST API for interacting with the engine, as well as command-line interfaces for working with the engine from the command line.
-
Docker Registry: The Docker Registry is a place where images are stored and distributed. When an image is pulled or pushed, the registry communicates with the Docker Engine to transfer the image.
-
Docker Hub: Docker Hub is a public registry that provides a central place for sharing and distributing images. It includes a web-based interface for searching, browsing, and managing images, as well as a REST API for programmatic access to the registry.
-
Docker Client: The Docker client is a command-line tool that provides an interface for interacting with the Docker Engine. It can be used to create and manage containers, images, networks, and volumes.
-
Docker Machine: Docker Machine is a tool that makes it easy to create and manage Docker hosts on various infrastructure. It can create hosts on various cloud providers, as well as on-premises environments.
-
Docker Compose: Docker Compose is a tool that simplifies the process of defining and running multi-container applications. It uses a YAML file to define the services that make up an application and their dependencies, and then starts and stops all the services with a single command.
-
Docker Swarm: Docker Swarm is a tool for clustering and scheduling Docker containers. It allows multiple Docker engines to be joined together in a swarm, and enables the management of multiple services across the swarm.
-
Docker Kubernetes Service (DKS): DKS is a tool for easily running and managing Kubernetes clusters on top of Docker, it provides a simpler and more secure way to run Kubernetes on-premises or in the cloud.
In summary, the Docker architecture is composed of several layers that work together to provide the functionality of the platform. This includes the Docker Engine for creating and managing containers, images, networks and volumes, the Docker Registry for storing and distributing images, the Docker Client for interacting with the engine, and various additional tools such as Docker Machine, Compose, Swarm and DKS to create more complex set ups, schedule and manage resources and clusters.
Docker objects
Here's a brief overview of the key objects you'll use when working with Docker:
Images:
- A snapshot of a container, used to create new containers
- Can be created using the docker build command
- Can be pulled from a registry using the docker pull command
- Can be pushed to a registry using the docker push command
- Can be inspected using the docker image inspect command
- Can be removed using the docker image rm command
- Can be listed using the docker image ls command
- Immutable and Versionable
- Smaller in size than a container
- Can be used to create multiple containers
- Can be shared with others
- Can be used as a base for creating custom images
An Image in Docker is a snapshot of a container, used to create new containers. They can be created using the docker build command, pulled from a registry using the docker pull command, pushed to a registry using the docker push command, inspected using the docker image inspect command, removed using the docker image rm command and listed using the docker image ls command. They are immutable and versionable, smaller in size than a container, can be used to create multiple containers, can be shared with others and can be used as a base for creating custom images. This allows for more efficient and reliable deployment and scaling of applications running in containers.
Containers:
- Lightweight, stand-alone, executable package that includes everything needed to run a piece of software, including the code, runtime, system tools, libraries and settings.
- Can be created using the docker container create or docker run command
- Can be inspected using the docker container inspect command
- Can be removed using the docker container rm command
- Can be listed using the docker container ls command
- Can be started, stopped and restarted using the docker container start, docker container stop, and docker container restart command respectively
- Can be executed commands in using the docker container exec command
- Isolation from host and other containers
- Use the host's kernel
- Share the host's network stack
- Lightweight and portable
- Consistent behavior across different environments
A Container in Docker is a lightweight, stand-alone, executable package that includes everything needed to run a piece of software, including the code, runtime, system tools, libraries and settings. They can be created using the docker container create or docker run command, inspected using the docker container inspect command, removed using the docker container rm command and listed using the docker container ls command. They can be started, stopped and restarted using the docker container start, docker container stop, and docker container restart command respectively and executed commands in using the docker container exec command. They provide isolation from the host and other containers, use the host's kernel and share the host's network stack, making them lightweight, portable and consistent in behavior across different environments.
Networks:
- A way to connect containers and define how they communicate
- Can be created using the docker network create command
- Can be inspected using the docker network inspect command
- Can be removed using the docker network rm command
- Can be listed using the docker network ls command
- Can be connected to a container using the --network flag in the docker run command
- Isolation between different networks
- Communication between containers in the same network
- Custom network driver can be used
- User-defined networks can be created
A Network in Docker is a way to connect containers and define how they communicate, it can be created using the docker network create command, inspected using the docker network inspect command, removed using the docker network rm command and listed using the docker network ls command. They can be connected to a container using the --network flag in the docker run command. It allows for isolation between different networks and communication between containers in the same network. Custom network driver can be used, and user-defined networks can be created to provide more control over the communication between containers and how the traffic is handled and managed.
Volumes:
- A way to store data outside of a container's filesystem
- Can be created using the docker volume create command
- Can be inspected using the docker volume inspect command
- Can be removed using the docker volume rm command
- Can be listed using the docker volume ls command
- Can be attached to a container using the -v flag in the docker run command
- Persists data even when the container is deleted
- Can be shared among multiple containers
- Can be backed up and restored
- Can be managed with volume plugins
A Volume in Docker is a way to store data outside of a container's filesystem, it can be created using the docker volume create command, inspected using the docker volume inspect command, removed using the docker volume rm command, listed using the docker volume ls command and attached to a container using the -v flag in the docker run command. Volumes persist data even when the container is deleted, can be shared among multiple containers, can be backed up and restored, and can be managed with volume plugins. This allows for more flexible and powerful data management for applications running in containers.
Plugins:
- Additional functionality for Docker engine
- Can be installed using the docker plugin install command
- Can be enabled using the docker plugin enable command
- Can be disabled using the docker plugin disable command
- Can be inspected using the docker plugin inspect command
- Can be removed using the docker plugin rm command
- Can be listed using the docker plugin ls command
- Provides additional functionality such as networking, storage, and authentication
- Third-party plugins can be installed
- Community plugins are available
- User-defined plugins can be created
A Plugin in Docker is additional functionality for the Docker engine, they can be installed using the docker plugin install command, enabled using the docker plugin enable command, disabled using the docker plugin disable command, inspected using the docker plugin inspect command, removed using the docker plugin rm command, and listed using the docker plugin ls command. They provide additional functionality such as networking, storage, and authentication. Third-party plugins can be installed, community plugins are available, and user-defined plugins can be created.
Services:
- A long-running process or task in a swarm
- Defined by a docker-compose.yml file or using docker service create command
- Can be scaled using the docker service scale command
- Can be updated using the docker service update command
- Can be inspected using the docker service inspect command
- Can be removed using the docker service rm command
- Load balancing is built-in for services
- Rolling updates can be done for services
- Service discovery and automatic failover is provided
- Services are built from a specified image and run in tasks on worker nodes
A Service in Docker is a long-running process or task in a swarm, it is defined by a docker-compose.yml file or using the docker service create command, it can be scaled using the docker service scale command, updated using the docker service update command, inspected using the docker service inspect command, and removed using the docker service rm command. Services have built-in load balancing, can have rolling updates, and provides service discovery and automatic failover. Services are built from a specified image and run in tasks on worker nodes in the swarm.
Swarm:
- A group of Docker engines working together as a single virtual system
- Can be created using the docker swarm init command
- Can be joined by worker nodes using the docker swarm join command
- Can be managed using the docker swarm command
- Services can be created and scaled using the docker service command
- Can be viewed using the docker node ls command
- Can be updated with the docker service update command
- Can be removed with the docker swarm leave command
- Provides built-in load balancing for services
- Enables rolling updates for services
- Provides service discovery and automatic failover
A Swarm in Docker is a group of Docker engines that work together as a single virtual system, it can be created using the docker swarm init command, joined by worker nodes using the docker swarm join command and managed using the docker swarm command. Services can be created and scaled using the docker service command, viewed using the docker node ls command, updated with the docker service update command and removed with the docker swarm leave command. A swarm provides built-in load balancing for services, enables rolling updates for services and provides service discovery and automatic failover, this allows the user to have a cluster of machines running Docker and deploy applications on top of it with features such as high availability, scaling and self-healing.
Task:
- Represent a single instance of a service
- Created by a manager node in a swarm
- Can be viewed using the docker service ps command
- Can be in one of several states: new, assigned, accepted, preparing, running, complete, or failed
- Can be scaled up or down with the docker service scale command
- Can be updated with the docker service update command
- Can be removed with the docker service rm command
- Used to ensure high availability and scalability of services
A Task in Docker represents a single instance of a service, it is created by a manager node in a swarm. It can be viewed using the docker service ps command and can be in one of several states: new, assigned, accepted, preparing, running, complete, or failed. It can be scaled up or down using the docker service scale command, updated with the docker service update command, and removed with the docker service rm command. Tasks are used to ensure high availability and scalability of services in a swarm, they are the building blocks of a service, and they are the units that are scheduled and run on the worker nodes.
Stack:
- A group of services that are deployed together
- Defined in a docker-compose.yml file
- Can specify services, networks, volumes, and secrets
- Can be deployed to a swarm using the docker stack deploy command
- Can be updated using the docker stack deploy command
- Can be removed using the docker stack rm command
- Allows for easy management of multi-container applications
- Enables scaling and rolling updates of services
A Stack in Docker is a group of services that are deployed together, it is defined in a docker-compose.yml file. It allows to specify services, networks, volumes, and secrets. It can be deployed to a swarm using the docker stack deploy command, updated using the docker stack deploy command, and removed using the docker stack rm command. Stack allows for easy management of multi-container applications, it enables scaling and rolling updates of services, making it easier to manage and maintain applications running in a swarm.
Registries:
- Repositories for storing and distributing Docker images
- Can be hosted locally or remotely
- https://hub.docker.com/ is a public registry
- Private registries can be set up on-premises or in the cloud
- Can be authenticated using credentials
- Images can be pulled and pushed to registries using the docker pull and docker push commands
- Used to store images that can be used to create containers
- Helps to version control images and enables easy sharing of images
Registries in Docker are repositories for storing and distributing Docker images. They can be hosted locally or remotely, and Docker Hub is a public registry. It's also possible to set up private registries on-premises or in the cloud, and they can be authenticated using credentials. Images can be pulled and pushed to registries using the docker pull and docker push commands. Registries are used to store images that can be used to create containers, and it helps with version control of images and enables easy sharing of images.
Secrets:
- Objects that securely store sensitive data such as passwords, keys, and credentials.
- Can be used by services in the swarm to access the data
- Encrypted at rest and in transit
- Can be managed using the docker secret command
- Can be passed to a service using the docker service create or docker service update command
- Only available to tasks running on the same swarm
- Can be rotated and revoked without rebuilding the image
Secrets in Docker are objects that securely store sensitive data, such as passwords, keys, and credentials. They can be used by services in the swarm to access the data, and are encrypted at rest and in transit. They are managed using the docker secret command and can be passed to a service using the docker service create or docker service update command. Only tasks running on the same swarm can access the secrets, and they can be rotated and revoked without rebuilding the image. Using secrets allows for more secure and flexible management of sensitive data in a Docker swarm.
Nodes:
- A physical or virtual machine that runs the Docker engine and is part of a swarm
- Can be either a manager node or a worker node
Manager Node:
- Responsible for managing the swarm
- Schedules services and maintains the desired state of the swarm
- Handles internal and external communication of the swarm
Worker Node:
- Responsible for running tasks
- Can run one or more tasks at the same time
- Communicates with manager nodes to receive updates and report status
Example:
- A web application is deployed on a swarm
- A manager node and two worker nodes are created
- A service for the web application is created with 3 replicas
- Manager node schedules the task on the worker nodes
- If a worker node goes down, the manager node detects and reschedules the task on another worker node
Endpoints:
- Represent a network endpoint for a service
- Connects a service to a network
- Can be used to access the service by its network name or IP address
- Provide a way to load balance network traffic
- Service discovery is built on endpoints
- They can be exposed to external networks or internal to the swarm
- Can be controlled by the endpoints options in the docker service create and docker service update commands
Endpoints are an important component of the Docker networking stack, they are used to connect services to networks, allowing them to communicate with other services and with the outside world. They can be used to load balance network traffic and provide service discovery. They are exposed to external networks or internal to the swarm, and can be controlled by the endpoints options in the docker service create and docker service update commands.
Example of how endpoints can be used in a Docker swarm:
Let's say you have a web application running in a container and you want to expose it to the internet. You can create a service for the container and use the docker service create command to create the service and expose it on port 80.
docker service create --name webapp --publish 80:80 --replicas 3 my-webapp-image
This will create a service called "webapp" and publish it on port 80. It will create 3 replicas of the service and use the image "my-webapp-image". This command will create an endpoint for the service that connects it to the default network and makes it accessible on port 80.
You can also use the docker service update command to update the service and modify the endpoint. For example, if you want to expose the service on a different port, you can use the following command:
docker service update --publish-add 8080:80 webapp
This will add an endpoint that exposes the service on port 8080 in addition to the existing endpoint on port 80.
This is a simple example, but it gives an idea of how endpoints can be used to connect services to networks and expose them to the outside world.
Docker run
The following command will run an ubuntu container, interactively link to your local command line session and run /bin/bash .
docker run -i -t ubuntu /bin/bash
When you run this command, the following happens (assuming you're using the default registry configuration):
-
Image pull: If the image, in this case ubuntu, is not present locally, it is pulled from the configured registry.
-
Container creation: A new container is created from the specified image.
-
Filesystem layer: A read-write filesystem is assigned as the last layer to the container, allowing the running container to create or modify files and directories in its local filesystem.
-
Network interface: A network interface is created to connect the container to the default network and an IP address is assigned to the container.
-
Command execution: The container is started and a command, in this case /bin/bash, is run inside the container.
-
Interactive mode: If the container runs in interactive mode and is linked to the terminal, input can be given through keyboard and output is logged into the terminal.
-
Container state: When the command completes, the container stops but is not deleted, it can be restarted or deleted.
The basic syntax of the docker run command is as follows:
docker run [OPTIONS] IMAGE [COMMAND] [ARG...]
-
IMAGE: The name of the image from which you want to create a new container
-
COMMAND: The command that you want to run in the new container. This is optional, if not provided the default command from the image will be used.
-
ARG...: Additional arguments that you want to pass to the command
For example,
docker run -it ubuntu:20.04 bash
This will run the command bash in an interactive mode (-it) in a new container created from the ubuntu:20.04 image.
Another example:
docker run --name mycontainer -d -p 8080:80 nginx:latest
This command will run a new container named "mycontainer" in detached mode (-d), it exposes port 80 of the container to port 8080 of the host and runs the latest version of the nginx image.
It's worth noting that docker run command is quite versatile and can take many options, such as options for controlling the container's name, ports, volumes, resources and also to control how the command is run such as in detached or interactive mode, etc.
Docker-compose.yml
Docker Compose is a tool for defining and running multi-container applications. The configuration for the application is defined in a file called docker-compose.yml, which is typically located in the root of the project.
Here's an overview of what the docker-compose.yml file may contains:
Services: The services key is used to define the different services that make up the application and their configurations. This includes things like the image to use, ports to expose, environment variables, and volumes to mount. Each service is given a name, which is used to refer to it in other parts of the configuration file.
Networks: The networks key is used to define the networks that the services should be connected to. This allows communication between the services.
Volumes: The volumes key is used to define the volumes that should be created and used by the services. This allows the data to persist even if the container is deleted.
Environment Variables: The environment key is used to define environment variables that should be passed to the services when they are started.
Build: The build key is used to define the context and Dockerfile for building the images for the services.
Depends_on: The depends_on key is used to define the order in which the services should be started.
Deploy: The deploy key is used to define the deployment settings and scaling options of the services in a swarm or a kubernetes cluster.
In summary, the docker-compose.yml file is the configuration file used by Docker Compose to define and run multi-container applications. It defines the services, networks, volumes, environment variables, build options, dependencies and deployment options for the application. Each service is defined with its own set of configurations, such as the image to use, ports to expose, environment variables, and volumes to mount, etc. The docker-compose.yml file can be used to define and run multiple services together, handle communication and linking between services, handle volumes, and environment variables. It also can handle the scaling and deployment of services on a swarm or kubernetes cluster. The docker-compose command line tool is used to start, stop and manage all the services defined in the docker-compose.yml file.
Docker compose example
Here's an example of a docker-compose.yml file for a simple application that consists of a web service and a database service:
version: '3.8'
services:
  web:
    image: nginx:latest
    ports:
      - "80:80"
    depends_on:
      - db
    volumes:
      - ./web:/usr/share/nginx/html
    environment:
      - VIRTUAL_HOST=myapp.local
  db:
    image: postgres:12
    environment:
      - POSTGRES_USER=myuser
      - POSTGRES_PASSWORD=mypassword
      - POSTGRES_DB=mydb
    volumes:
      - mydbdata:/var/lib/postgresql/data
volumes:
  mydbdata:
This compose file defines two services, one named "web" running on nginx and another named "db" running on postgres. The web service expose port 80 and depends on the db service, and mount a local directory ./web to the container, also set an environment variable VIRTUAL_HOST. the db service, set environment variables such as POSTGRES_USER, POSTGRES_PASSWORD, POSTGRES_DB. Also creates and mounts a volume named mydbdata to persist the data.
This is just an example and as your application grows, you can add more services, networks, volumes, environment variables and also handle advanced options such as scaling and deploy options. The version key is used to specify the version of the Compose file format.
It's important to note that the structure, keys and values used in a compose file could be different depending on the version of the Compose file format being used.
It's also worth noting that the example I gave is a very basic example, in real-life applications, you might have more services, environment variables, volumes, and options. In addition, you can also use docker-compose to scale up and down services, handle rolling updates and provide more control over the services of your application.
It's also worth mentioning that you can use variables for many of the configuration options using the env_file or environment key. It allows you to keep sensitive data like passwords, or configs out of the compose file or from being hardcoded.
It's also can be helpful to use .env files or environment variable to configure your application without modifying the compose file.
IPv6 networking
-
IPv6 is the latest version of the Internet Protocol (IP), which is used to identify and locate devices on a network.
-
IPv6 addresses are 128-bits long, represented in hexadecimal and separated by colons (e.g. 2001:0db8:85a3:0000:0000:8a2e:0370:7334)
-
IPv6 addresses have a larger address space than IPv4 addresses, which allows for more devices to be connected to the internet.
-
IPv6 addresses are divided into two main types: Global unicast addresses and unique local addresses (ULA).
-
Global unicast addresses are globally unique and are used for public IP addresses, similar to IPv4 public addresses.
-
Unique Local Addresses (ULA) are intended for local communication and are not globally unique, similar to IPv4 private addresses.
-
IPv6 also includes improvements in security, auto-configuration, and quality of service (QoS) compared to IPv4.
-
IPv6 is an essential component for the internet of things (IoT) and other technologies that rely on a large number of connected devices.
-
IPv6 is backwards-compatible with IPv4, so IPv4 and IPv6 can coexist and communicate with each other.
-
IPv6 is gradually being adopted by internet service providers (ISPs) and companies to replace IPv4, as the number of available IPv4 addresses is running low.
Let's break down the IPv6 address "fd00:1234:5678:9abc::1" into its individual parts:
"fd00" - This is the first 16 bits of the address, and it is the "prefix" of the address. In this case, "fd" is the global identifier for "unique local addresses" (ULA) which are similar to private IPv4 addresses that are intended for internal use within a single link or subnet, and are not globally unique.
"1234" - This is the next 16 bits of the address, and it's part of the prefix too. It's a random value that is used to differentiate between different ULA addresses.
"5678" - This is the next 16 bits of the address, it's part of the prefix too. It's a random value that is used to differentiate between different ULA addresses.
"9abc" - This is the next 16 bits of the address, it's part of the prefix too. It's a random value that is used to differentiate between different ULA addresses.
"::" - This is a special notation that indicates the presence of one or more sets of 16 bits of zeros in the address. In this case, it indicates that there are no more bits in the prefix, and that the next 64 bits are part of the host portion of the address.
"1" - This is the last 64 bits of the address, and it's the "interface identifier" of the address. This part of the address identifies a specific host or device within the network. In this case, "1" is the loopback address, meaning that the address "fd00:1234:5678:9abc::1" refers to the loopback interface of the host on the network "fd00:1234:5678:9abc"
It's important to note that the address "::1" is the same as "::0000:0000:0000:0001" and that the leading zeroes can be omitted, hence the "::" notation is used to indicate the presence of zeroes, in this case the host part is all zeroes.
It's also important to note that, while the address "fd00:1234:5678:9abc::1" is a valid IPv6 address, it is not a globally-routable address. The "fd00" prefix indicates that it is a unique local address (ULA), which is similar to a private IPv4 address and is intended for internal use within a single link or subnet, and are not globally unique. This means that it can only be used within a specific internal network and cannot be used to communicate with devices on the Internet.
Additionally, ULA addresses are not guaranteed to be unique across different networks, so it's possible that another network might be using the same "fd00:1234:5678:9abc" prefix. In such case, you can use another random generated prefix.
Also, if your network is connected to the internet and you want to connect to the internet or other networks, you will need a globally routable address, in this case you will need to use IPv6 addresses that have been assigned to you by your ISP or other organizations.
In summary, the IPv6 address "fd00:1234:5678:9abc::1" is a unique local address (ULA) that identifies the loopback interface of a host on the network "fd00:1234:5678:9abc", which is intended for internal use within a single link or subnet and not for global communication.
Temporary IPv6 Address
When you run the ipconfig command on a Windows machine, you may see multiple temporary IPv6 addresses listed under the "Temporary IPv6 Address" section. This is because IPv6 allows for the use of temporary addresses, also known as "privacy addresses", in addition to the permanent address assigned to the network interface. These addresses are generated using a process called "address autoconfiguration", which creates a unique local address using a combination of the device's permanent address and a randomly generated interface identifier. The purpose of these temporary addresses is to increase the privacy and security of a device by changing its address periodically and making it more difficult for an attacker to track a device's activity over time.
Unique Local Address
- Unique Local Addresses (ULA) are IPv6 addresses for communication within a private network.
- Not intended for communication outside of the private network.
- Not globally routable.
- Used for internal networks similar to IPv4 private addresses.
- Range: fc00::/7
- Intra-network communication
- Not globally unique
- Similar to IPv4 private addresses such as 10.0.0.0/8, 172.16.0.0/12, and 192.168.0.0/16
- Designed to provide unique addresses for internal network communication and avoid conflicts with other networks.
A Unique Local Address (ULA) is similar to a private IPv4 address in the sense that it is intended for use within a local network and is not globally unique, but the format and ranges of ULA and private IPv4 addresses are different.
ULA addresses are assigned from the "fc00::/7" prefix, which is different than the prefix used for private IPv4 addresses (10.0.0.0/8, 172.16.0.0/12, and 192.168.0.0/16). Additionally, ULA addresses are in IPv6 format, which have 8 groups of 16-bits hexadecimal separated by colons (e.g. fc00:1234:5678:9abc::1)
While private IPv4 addresses are also intended to be used within a local network and not routed on the public internet, the use of ULAs provides additional benefits like increased address space and improved security.
So in short, ULA is similar to private IPv4 addresses in that it is intended for use within a local network, but it is not identical and are intended for IPv6 addressing.
Global Unicast Address
- Global unicast addresses are globally unique and are used for public IP addresses, similar to IPv4 public addresses.
- Allocated by the Internet Assigned Numbers Authority (IANA) and Regional Internet Registries (RIRs) to ISPs and organizations. https://www.whatismyip.com/
- Routed on the public internet, can be used for communication to any other device on the internet.
- Publicly reachable on the internet
- Public IP addresses
- Internet-facing IP addresses
- Globally unique
- Assigned by ISPs and RIRs
- Used for communication on the internet
- IPv6 address type
A Global unicast address is similar to a public IP address that is assigned to you by your Internet Service Provider (ISP). Global unicast addresses are globally unique and are used for public IP addresses, similar to IPv4 public addresses.
An IPv6 global unicast address is assigned to a device or network that needs to be publicly reachable on the internet. It is allocated by the Internet Assigned Numbers Authority (IANA) and Regional Internet Registries (RIRs) to ISPs and organizations. These addresses are routed on the public internet and can be used for communication to any other device on the internet.
Link-local IPv6 addresses
- Link-local IPv6 addresses are similar to Automatic Private IP Addressing (APIPA) addresses in IPv4 in that they are intended for use on a single network segment, or link.
- They are not globally routable and are not intended for communication outside of the local network segment.
- These addresses are typically used for communication between devices on the same network segment and can be used for device discovery, address auto-configuration, and other similar purposes.
- Similar to APIPA, where the IP range is 169.254.1.0 to 169.254.254.255, Link-local addresses have a range of fe80::/10.
- The main differences between these ranges is the APIPA is v4 and Link-local is v6, and they have a different range.
- Use on a single network segment
- Not globally routable
- For device discovery
- Address auto-configuration
- Similar to APIPA range of 169.254.1.0 to 169.254.254.255
- Link-local range is fe80::/10
Link-local addresses are a type of IPv6 address that are intended for use within a single network segment, or link. They are not intended for communication outside of the local network segment and are not globally routable. These addresses are typically used for communication between devices on the same network segment, such as for device discovery, address auto-configuration, and other similar purposes. The range of Link-local addresses is fe80::/10. They are similar to Automatic Private IP Addressing (APIPA) addresses in IPv4, which have a range of 169.254.1.0 to 169.254.254.255, in terms of usage and purpose.
A Link-local IPv6 address is typically in the form of "fe80::/10", where the first 10 bits are fixed as "1111 1110 10" in binary. An example of a link-local IPv6 address is fe80::a00:27ff:fe7e:1c8f. These addresses are only unique and valid within the local link or network interface and cannot be routed over the internet.
IPv6 ranges
- Global Unicast Addresses:
2000::/3 - Link-local Unicast Addresses:
fe80::/10 - Unique Local Addresses (ULA):
fc00::/7 - Multicast Addresses:
ff00::/8 - Loopback Address:
::1/128 - Unspecified Address:
::/128 - IPv4-mapped IPv6 addresses:
::ffff:0:0/96 - IPv4-translated addresses:
::ffff:0:0:0/96 - IPv4-compatible addresses:
::/96
 Installation How to install Docker